Be yourself; Everyone else is already taken.
— Oscar Wilde.
This is the first post on my new blog. I’m just getting this new blog going, so stay tuned for more. Subscribe below to get notified when I post new updates.
Be yourself; Everyone else is already taken.
— Oscar Wilde.
This is the first post on my new blog. I’m just getting this new blog going, so stay tuned for more. Subscribe below to get notified when I post new updates.
https://player.vimeo.com/video/418290276
Script:
There was a period of time for me where I was -just somewhat lost
Like there was something missing that missing in my life that I couldn’t really figure out
Where I’m from everything was very driven by sports
I played everything, ranging from basketball
To soccer
To football
Too baseball
I very good and at these activities but they just didn’t do it for me
This was eating away at me
It became very frustrating because I had all of these people around me who had these different passions and i was there involved in nothing I truly loved
Then it hit me
I was watching a music video and was looking at their artists perform
The music was great but there was something more that stuck out to me
The clothing
I started researching these clothing brands and became obsessed
Starting off at low end street wear companies to researching and learned about the biggest high end fashion houses in the world
I ended up finishing out those sport seasons but never went back once they started back up
I ended up taking the time where i would be in practice, to instead using that time to travel in the Manhattan and the other boroughs to visit various retail shops, thrift stores, and places to purchase fabric
I would do this all the time and as frequently as I could
I became enamored with the fashion industry as a whole
I fortunately had opportunities to go visit things like limited Channel exhibits and go visit showrooms for different retailers
All it took was that music video to spark in my mind what I have already had
The void that I thought was once there was there no more.
The music editing process with using Audacity was super easy. Bring the mp3 into the Audacity app wasn’t hard and cutting down the time was really easy also. I got the music to play throughout the presentation because once I got the wav file of the cut down version of the song I chose for the presentation, I just clicked “play across all slides” to ensure that. I got the presentation to run on its own by rehearsing the times of the presentation and making sure everything matched up accordinly.
For the second slide, the process of making the bullets come in one by one was easy. All you have to do was create an entrance animation for each different bullet and make sure they come one after the other. This is very important to have the bullets come in one by one because when the viewer sees all of the bullets up there at once, its becomes over whelming and the viewer is getting and overload of information at one time. Presenting the bullets one by one is the most effective way because it gives the viewer a chance to digest the information easier and fully take in all of the information without feeling overwhelmed.
I animated the third slide by first having the title of the album which was “Astroworld” enter into the slide. Next what I did was put the cover of the album on the left half of the slide to come in. Lastly, for the third slide, I had the track list songs by having the first half of songs pop up and then after that the second half of songs came in. The track list was placed to the right of the picture of the album.
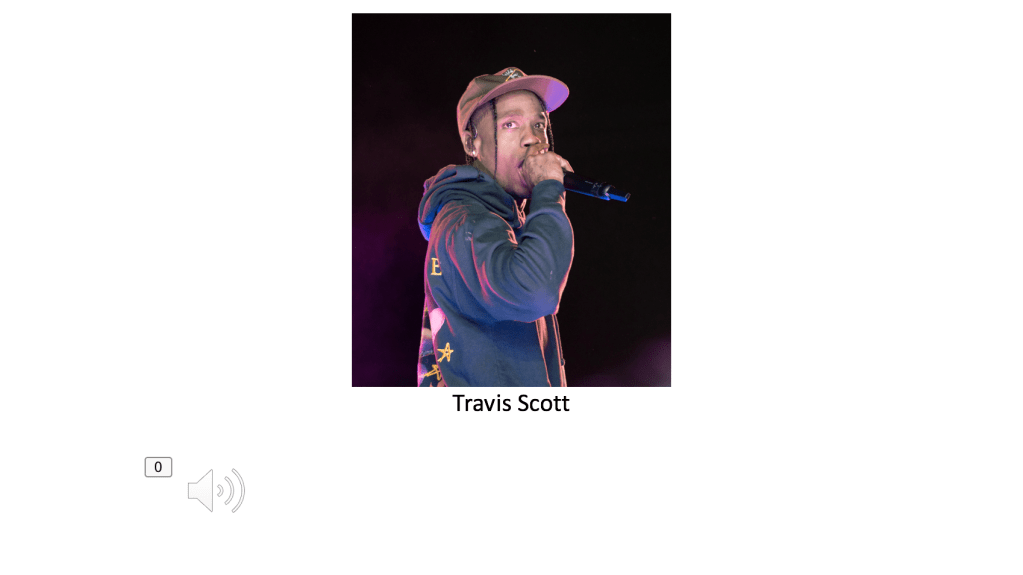
For the fourth slide, setting up the table was not hard. What I did was went to the Insert tab in powerpoint and selected table and created a 4×4 table with the label’s Artists like Travis Scott, Hometown, Debut Album, and the number of Twitter Artists they had. The other two artists I compared Travis Scott too were Future and Young Thug. I used seperate text boxes throughout the table I created because then I was able to make each text box pop up on their own whenever I chose for them to pop up. If I didn’t use separate text boxes then everything written in the table would’ve popped up all at the same time. I created those separate text boxes by going to the Insert tab and choosing text box and placed them accordingly throughout the table.
On the last slide of the presentation, I chose pictures that I felt represented Travis Scott as person as well as a musician which is way I put pictures of himself performing, pictures of him with his family, and pictures from some of his promotions he’s done in the past. The used the same animation for each picture throughout the final slide of the presentation to give the slide some organization and sequence between pictures. I changed the link name and color by changing the link to a hyperlink and then changing the option for a new hyperlink color.
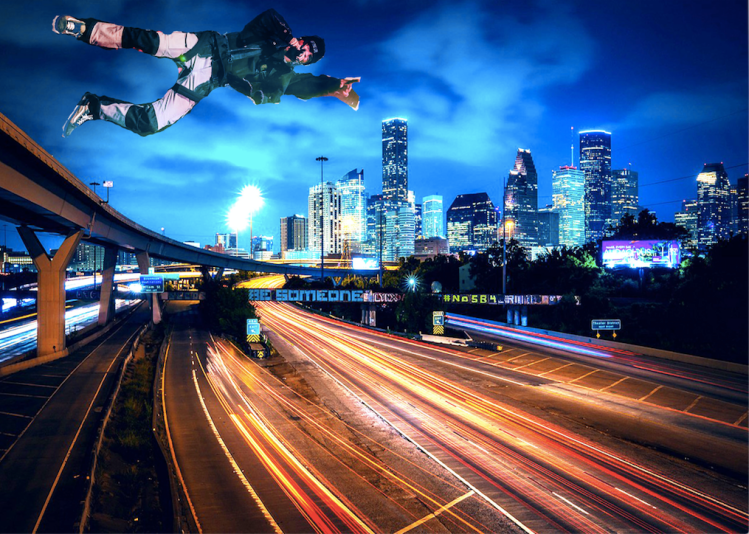

The design format I went with for my concert poster was the perspective format. The perspective format gives the person viewing my poster a certain point of interest to have their eyes gravitate too. I chose this format for my concert poster because I felt that the perspective format showed off the background of the concert poster and the main content of the concert poster. That is why I chose to use the perspective format for my concert poster.
The font I used for my concert poster was Phosphate. I chose Phosphate because with the city skyline in the background, Phosphate looks to me like a font that would be used on a large billboard while driving into the city and it just has a large city feel to me. Where it says the words “Travis Scott” are the biggest fonts and where it says “May 1st, 9 Pm” is smaller but still uses the same font and white color so both texts stand out in the sky on the concert poster. I put the words in the top right corner of the concert poster because it was really the only “white space” left in the concert poster.
Both images I used are images I found on google that correlated with the terms of being allowed for reuse if there were modifications of the images. I used the Houston, Texas skyline for the background of the concert poster because Houston is the hometown for the artist I chose, Travis Scott. The second image I used an image of Travis Scott jumping and the outfit he was wearing in the photo almost looked like he was wearing a parachute of some sort. That is why I positioned him in the upper left corner above the skyline to give off the impression that he was parachuting into the city or flying. The images were changed to meet the 50% mark by blending the photos with different effects and changing the dimensions of the photos. The blend I used for both images was Hard Light. I used the “white space” of the background by putting the image of Travis Scott and the text in the “white space” at the top of the concert poster.
One issue I ran into while creating this poster was trying to remember how to blend photos and out certain effects on images of my concert poster. I solved this problem by reviewing old notes I took in class and by looking up videos on Youtube. I used photoshop to create my concert poster which I believe was the easiest and most efficient program to use because everything you needed to use to create a concert poster was available and easily accessible.
The first image I am going to use is the photo of OJ Simpson’s mugshot that used for Times Magazine and Newsweek during his murder trial. Newsweek used Simpson’s original mugshot where Times Magazine used the same image but darkened the overall image. Times Magazine said they darkened the image to give the image a more dramatic tone due to the fact that it was connected to a murder trial. I do understand the reason for Times Magazine darkening the image but there was a lot of racial tension connected to this trial and a lot of racial tension overall during this time so it was not the smartest idea to darken the image due to the circumstances of time. If Times Magazine just kept the original mugshot photo there would be no issue. I would say the altered photo of Simpson would be okay under the rules of Fair Use because the change that was made was appropriate for its use.
The next photo I used was a photo taken in Beirut, Lebanon where there was an Israeli air raid. The original photo showed smoke coming from a building and hovering over the suburb. In the altered photo the smoke is a lot darker and there is a noticeable amount of smoke coming from the village then there was in the original photo. This was done to exaggerate the damage that was done during the air raid. I do think that the way the image was altered was unethical. I say that because the altered image made the damage done during the air raid a lot worse than then it actually was. This could cause more panic to the public then needed and can be seen as if the photographer was pushing a political agenda. The photographer could have avoided this by just not altering the smoke of the picture. I would say you can’t dramatize and exaggerate a photo more than it realistically is because it gives false information. The Fair Use rules would say that the amount changed was not appropriate for the cause.
The last photo I’m going to discuss is a photo of a burning building published by FOX13 in Memphis said that this was in Baltimore, Maryland and was related to riots happening within Baltimore. It turns out that the FOX13 messed up and after publishing the article using that photo was actually taken a year prior in Valencia, Venezuela. This definitely could have been avoided by FOX13 if they have double checked their sources and made sure that the photo was reliable instead of just using the photo without really knowing.This move made by FOX13 can’t be justified because what they published was wrong.
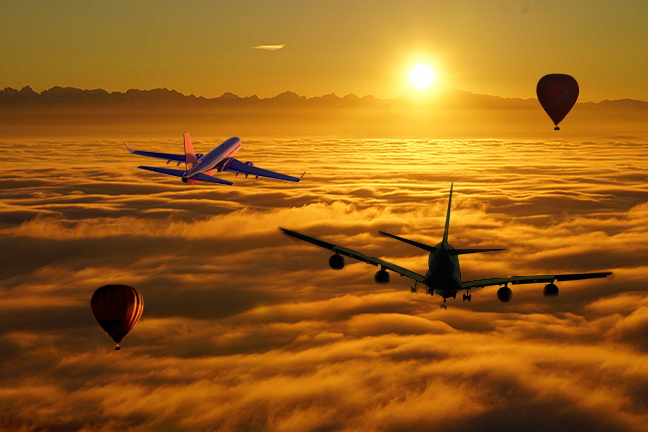
One of my photos that really coincide with my font poem that are in my collage would be the background which is a sunset. In my font poem there is mention of a sun so that would be the correlation of to my collage. Also all of the photos I chose for this collage are hidden above the clouds. In my font poem the word “hidden” is used so that is why I chose to use a background that can give the effect as if the object I put in the collage are being hidden. The images I used in my collage were 2 planes and 2 hot air balloons. I used those images because I just thought it would make sense with the background of the collage. I brought the the images in the collage by downloading them and putting them into photoshop. From photoshop I would use the magic eraser tool to single out the main focus of the image I wanted to use. Then I would copy and paste that part of the image into the collage and use the free transform tool to size up the image and put the image where I want it to be featured in the collage.
The way I positioned the images was I put one hot air balloon in the bottom left corner and the other one in the upper left corner. I put one of the planes I used off centered to the right and the other plane I used was off centered to the right. The image I used filters, a layer mask, and blended was the plane that is off centered to the right. At the first I used the Lasso cropping tool to cut out the part of the image I want and blended the edges of the part that I cropped out. From there I pasted the image into the collage and fully blended the image into the collage by using the magic eraser tool. From there I put a layer mask on the plane and used the darken blending filter on the plane.
I would say the part of my collage that I’m most proud of would be the placement and filters I put into my collage. I feel those aspects of my collage are what really makes my collage stand out. If I had more time to work on my collage I would’ve figured out a way to incorporate the moon into my collage to have more correlation with my font poem. My strengths in photoshop would be the ability to incorporate certain effects into my photoshop projects to make them more visually pleasing. My weakness in photoshop would be the fact that I’m very unfamiliar with photoshop based on the fact I’ve just started using it this semester. If I had to work on one thing with photoshop would be to just spend more time on photoshop in general to become more familiar with the software.
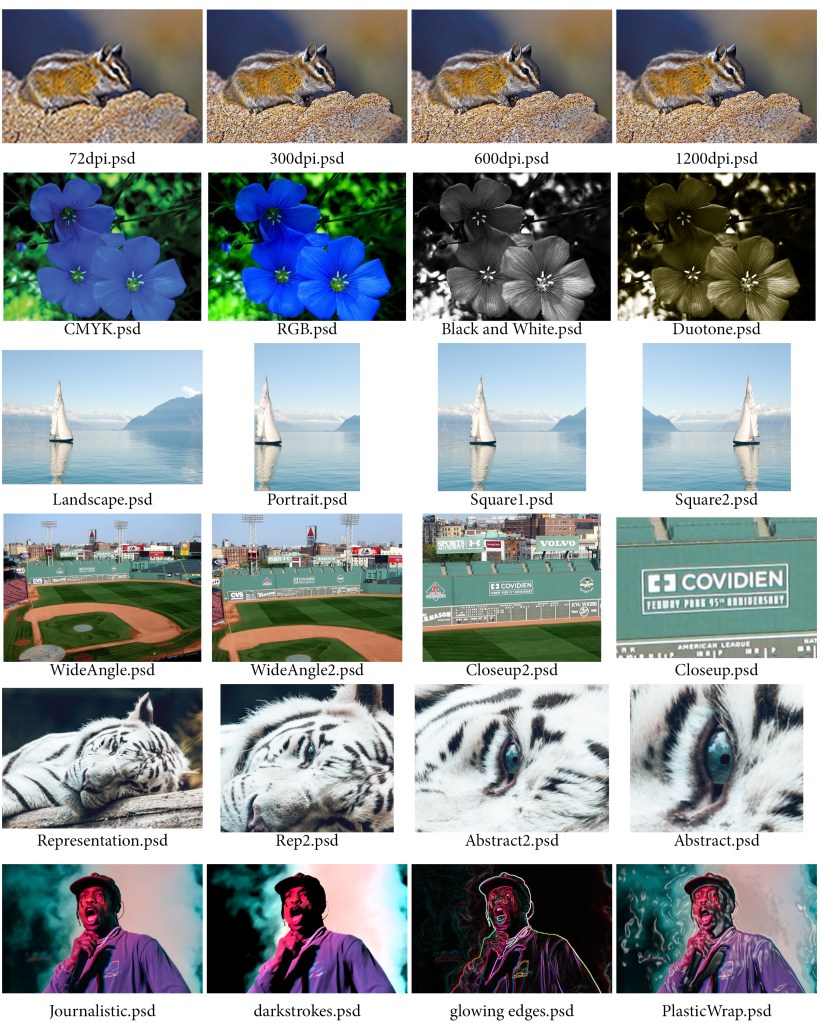
Row 1 – Resolution:
In the first row of the contact sheet we started working with the resolution of images. The first image was of a chipmunk. We started off with putting the image at 1200 DPI. 1200 DPI is used for high quality printing. DPI stands for dots per inch. The higher the dots per inch the more clear the photo is going to be. The next resolution thing I did was change the same image to 600 DPI. The way you change the DPI is through the image size under the Image tab at the top of the screen. As the DPI decreases so does the resolution causing the image to not be as clear as it was before. Next, I changed the image to have 300 DPI. 300 DPI is the same DPI magazines use. Lastly, we changed the DPI to 72 which is the lowest DPI we used throughout the contact sheet.
Row 2 – Format/Mode:
For this row we used an image of flowers. The first image started us off using the RGB color scheme. RGB stands for Red, Green, Blue so the image is created only using the colors Red, Green, and Blue. The next thing we did was change the color scheme from RGB to CMYK. CMYK stands for Cyan, Magenta, Yellow, and Black so just as the way RGB works is the same way CMYK works but instead of the image using Red, Green, and Blue to make up the image, the image uses Cyan, Magenta, Yellow, and Black. CMYK is the color scheme that printers use to print out words and images. Then we changed the image to Black and White. In order to change the image to Black and White from the original image is you need to first go into the channel mixer and click Monochrome. From there you play with the color sliders of the image to get how exactly you want to look. You then go back into the channel mixer and go into curves where you play with that where you essentially want to have the curves create and “S” shape to get the perfect shading of the image. The last image for the Format/Mode row was to change the photo to have a Duotone/Sepia tone. To do that you have to follow the instructions to get the photo Black and White like before and then flatten the image. Then go to Mode under the Image tab and change it to Grayscale. Then go back into Mode under the Image tab and change the image from Monotone to Duotone and pick another color of your choice. In my contact sheet for row 2 I chose to pick a yellowish brown color.
Row 3 – Orientation:
In row 3 we used an image of a sailboat on the water with a mountainous scenery behind it. The first image I put into the contact sheet was in Landscape. Landscape is when the width of the image is more than the height of the image. For the next image we cropped a portion of the sides of the image and then went into the ratios of the image where we changed the image from Landscape to Square. For the image after that we basically did the same thing as for the first square image but instead we went to the Image Rotate tool and flipped the image horizontally and created a second square image. The last image we made in row 3 is we went back to the original image and changed the image from Landscape to Square. After that we went to the ratio of the image and changed the ratio to 5:7 which is Portrait and cropped the sides and focused on a part of the image we wanted to focus on.
Row 4 – Framing:
In row 4 we are using an image of that was taken at Fenway Park in Boston, MA. The original image for this row is a wide angle photo of Fenway Park. This is the widest angle image that is used in this row. For image two, we are going to use the crop to and crop into the image a little from all sides of the image while making sure the image is still at its original ratio. For the third image we are going to find a part of the photo that we want to focus on so we are going to crop into the photo some more using the crop tool closer into the part of the image we want to focus on. In the last image of this we are using the crop tool again and fully crop into the image so we can only see the part of the image we have been focusing on. The part of the image I focused on was a sign that was located on the left field wall which is also known as the Green Monster.
Row 5 – Aesthetic Content:
For this row we had to go onto the internet and find our own image that we wanted to use. The image I chose for row 5 was an image of a white tiger that was laying on a log in the forest. In row 5 we basically did the same thing by finding something within the image to focus on by using the Crop tool to zone in on that part of the image and create an abstract version of the image I found. Throughout the images of row 5 I start with the whole image to then overtime cropping the image more and more till eventually all you can see in the image was just the eye of the white tiger.
Row 6 – Purpose:
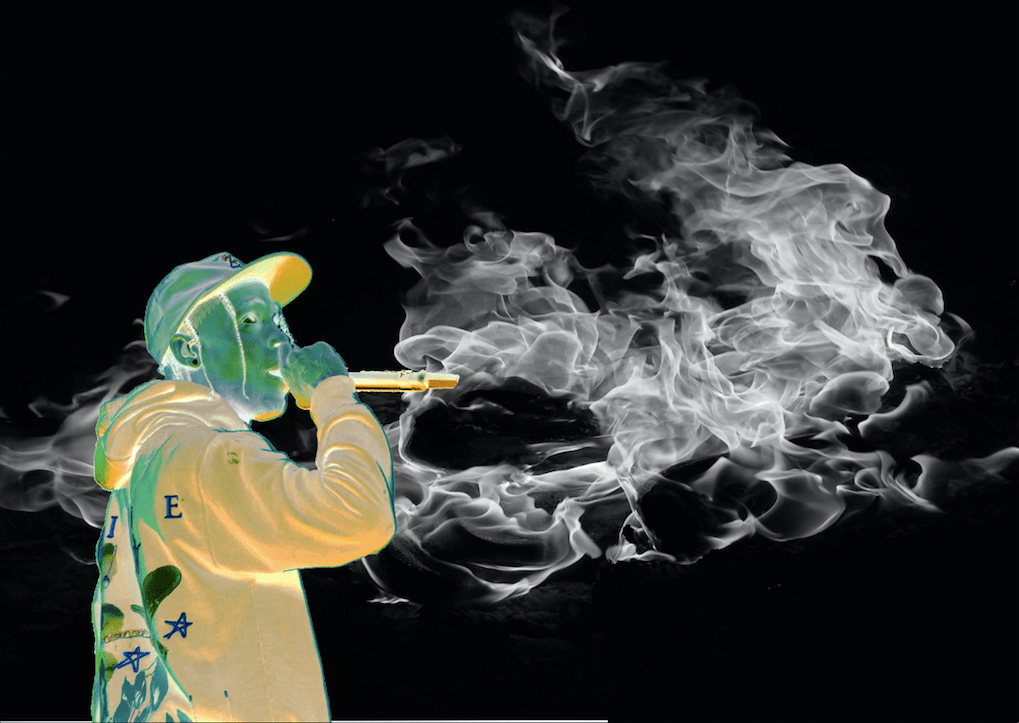
For row 6 we also had to go onto the internet and search for a photo that we wanted to use for this row. The image I chose was an image of rapper Travis Scott performing a song during one of his concerts. The original photo put into row 6 is called the Journalistic photo because there has been no filters added to the photo yet. Over the span of the next three images I used the Filter tool and added one filter to each image. The filters I used for row 6 were Glowing Edges, Dark Strokes, and Plastic Wrap. Within each image I also played around with the sliders of each filter I used to get the certain effects I was trying to get out of each filter.
Font 1: Times New Roman
Times New Roman was created by Stanley Morison in 1931. Times New Roman came about because Morison was upset about the printing quality of a London daily newspaper “The Times”. “The Times” hired Morison to create a new typeface that he that would look good and this is where Morison came up with Times New Roman which replaced the font Times Old Roman. The reason I chose this font was because of how common it is used and the traditionality of the font. I personally don’t like Times New Roman and tend to find it very boring. A situation where Times New Roman would be used could be when you are writing an essay for school. I have had many teachers in the past use Times New Roman as a requirement for our work.
Font 2: Bodoni The font Bodoni was created by Giambattista Bodoni in 1790 at the palace of Duke Ferdinand of Bourbon-Parma. I chose this font because I like the elegance of the font. I like how the letters of the font have parts of the letter that have thick lines that sharply turn into very thin lines. One scenario this font can be used is for movie posters. The movie “Goodfellas” used Bodoni for their movie poster.

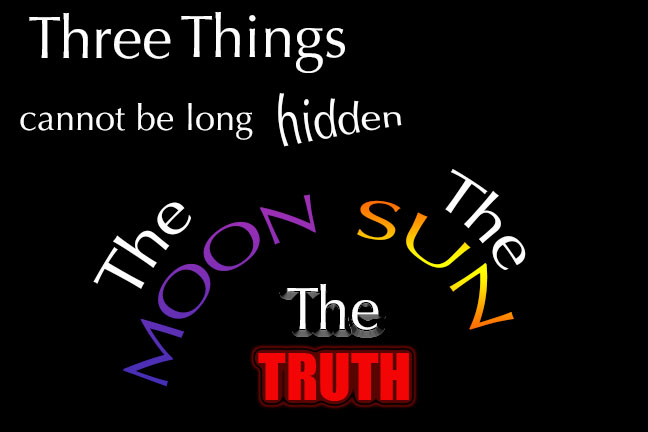
The saying I chose to use for my font poem was a quote from Buddha. That saying was “Three things cannot be long hidden: the sun, the moon, and the truth.” The reason I chose this saying was because I felt like it gave me good content to work with when creating the design portion of my font poem. I have also always been pretty interested in Buddha because I never really knew what he stood for in the past so this saying gave me more insight into that.
The fonts I chose were Optima and Eurostile. I chose the font Optima because mainly because in part of the poem I bend the words to look like they represented the rising and setting of the sun and the moon. With this font I thought the style that this font gave off when set in this manner fit this design very well. I used the Eurostile because it put a lot of emphasis on the word Truth which is the only work in the saying where I used Eurostile.
I put the first words “Three Things” first at the top in a large Optima font to have those words pop out to the eye first. The next words under that I put “cannot be long hidden” in a smaller font. I used the effect Squeeze on the word hidden to give the effect as if the word “hidden” is actually trying to be hidden. The next words I put were “The Sun, The Moon”. I placed the words to represent the rise of the sun and the setting of the moon by using the Arc effect. I changed the word moon to a purple to represent night time and the sun to orange to represent the sun. Lastly I put the words “The Truth” under the words “The Sun, The Moon”. I used the effects Bevel & Emboss and Gradient on the word “The” to have the eye lead to these words after reading “The Sun, The Moon”. I also used the Outer Glow effect on the word “Truth” to give that word the most emphasis out of the rest of the saying because this is where the saying ends.
The one problem I ran into when creating my font poem was that I wasn’t familiar with photoshop due to the fact I have never used it before but still managed to figure it out. One way I got around this was through trial and error. I tried different effects, fonts, and word placing until I thought I found the right fits. I also was given help by my professors and fellow classmates to help me through the process of getting used to photoshop.
The thing I am most proud about after making my font poem was my word placing and the effects I used on certain words. The word placing really helped step up my font poem from being just saying to actually giving the saying I used substance. This also goes for my effects. The effects in my font poen helped out a lot by giving certain words in my font poem emotion which gives off the ability for the viewer of my font poem to connect to the message my font poem is conveying.
This is an example post, originally published as part of Blogging University. Enroll in one of our ten programs, and start your blog right.
You’re going to publish a post today. Don’t worry about how your blog looks. Don’t worry if you haven’t given it a name yet, or you’re feeling overwhelmed. Just click the “New Post” button, and tell us why you’re here.
Why do this?
The post can be short or long, a personal intro to your life or a bloggy mission statement, a manifesto for the future or a simple outline of your the types of things you hope to publish.
To help you get started, here are a few questions:
You’re not locked into any of this; one of the wonderful things about blogs is how they constantly evolve as we learn, grow, and interact with one another — but it’s good to know where and why you started, and articulating your goals may just give you a few other post ideas.
Can’t think how to get started? Just write the first thing that pops into your head. Anne Lamott, author of a book on writing we love, says that you need to give yourself permission to write a “crappy first draft”. Anne makes a great point — just start writing, and worry about editing it later.
When you’re ready to publish, give your post three to five tags that describe your blog’s focus — writing, photography, fiction, parenting, food, cars, movies, sports, whatever. These tags will help others who care about your topics find you in the Reader. Make sure one of the tags is “zerotohero,” so other new bloggers can find you, too.
